Featuring guest authors; crafting tips and projects; recipes from food editor and sleuthing sidekick Cloris McWerther; and decorating, travel, fashion, health, beauty, and finance tips from the rest of the American Woman editors.

Note: This site uses Amazon affiliate links. As an Amazon Associate, I earn from qualifying purchases.
Showing posts with label craft project. Show all posts

Sunday, August 4, 2013

CRAFTS WITH ANASTASIA--PHOTO COLLAGE MONOGRAM


Photo Collage Monogram

Materials: large Masonite letter (available in craft stores), white spray primer, acrylic paint in your choice of color for background, sponge brush, family photos, copy machine, scissors, glue stick, X-acto knife, clear plastic adhesive sheet (such as Contact Paper) large enough to cover letter.

1. Prime Masonite letter. Allow to dry.

2. Paint sides and front of letter with acryllic paint. Allow to dry.

3. Make black and white copies of photos, reducing size if necessary.

4. Cut out photos and glue in desired positions to letter. Allow glue to dry thoroughly. Trim photos to edge of letter with X-acto knife.

5. Carefully apply clear adhesive film to top of letter. This can be tricky. The easiest way is to cut a piece slightly larger than the Masonite letter. Pull away the backing sheet on one edge and tape the two corners of the sheet, sticky side up, to a flat surface. Slowly remove the remainder of the backing sheet and tape down the remaining corners. Place the letter face down over the adhesive sheet. Using a scissors, trim away excess close to letter. Turn the letter face up and burnish the film. Then using the X-acto knife, trim the remainder of the  film even with Masonite.

Sunday, April 15, 2012

CRAFTS WITH ANASTASIA-- COUNTRY HOT PAD

If you’re like me, you never have enough hot pads, especially when you’ve cooked up a huge spread for company. Here’s a quick way to increase your hot pad supply and use up some of your fabric scraps. -- AP

Materials:
8-1/2” x 8-1/2” cotton fabric (sample uses red/ecru homespun gingham check
8-1/2” x 8-1/2” quilted fabric (sample uses quilted muslin)
two 7-1/4” x 7-1/4” pieces batting
6” x 6” contrasting fabric (sample uses blue ticking)
DMC #12 ecru Perle cotton
6” x 6” iron-on adhesive
straight pins
embroidery needle
scissors
iron
Press under 1/4” around perimeter of cotton fabric square and quilted fabric square.

Print the heart pattern, enlarging the heart to 4-3/4" wide. Trace the heart onto the paper backing of the iron-on adhesive.

Following manufacturer’s directions, apply iron-on adhesive to wrong side of heart fabric. Cut out the heart. Peel away paper backing. Position heart in one corner of cotton fabric, 3/4” from edges. Iron in place, following manufacturer’s directions.

With quilted fabric on bottom, sandwich batting between wrong sides of both pieces of fabric. Pin together, matching outer edges.

Using the Perle cotton, stitch around the perimeter in blanket stitch. Quilt 1/8” around the heart.

Sunday, March 6, 2011

CRAFTS WITH ANASTASIA-- YO-YO SHAMROCK PIN

Yo-yo’s are one of the easiest fabric crafts to make and a great way to use up fabric scraps. Just in time for St. Patrick’s Day, we have a quick and easy shamrock pin made from three yo-yo’s.

YO-YO SHAMROCK PIN
Supplies
cardboard
compass
scissors
scrap of green print fabric
fabric pen
quilting thread
sewing needle
three lt. green 3/8” buttons
12” DMC 6160 green Memory Thread
fabric glue
 glue gun and glue sticks

Using the compass, draw a 4” diameter circle on the cardboard. Cut out the circle.

Using the cardboard circle as a template, draw three circles on the wrong side of the fabric. Cut out the circles.

With the wrong side of the fabric facing up, fold the edge over 1/4". Using a running stitch, sew around the entire circle close to the fold line. Pull the thread tightly so the fabric cinches up. Flatten and shape the yo-yo. Run the needle through the center back. Now stitch a button over the center of each hole.

Arrange the three yo-yo’s as shown in the photo with then overlapping each other slightly. On the wrong side, tack the yo-yos in place.

To form stem, twist the ends of three 10” pieces of Memory Thread, then braid. Fold braid in half and twist together from fold out to ends. Twist cut ends together, securing with a dab of fabric glue. Allow to dry.

Using the glue gun, glue the cut ends of the stem just below the center back of the shamrock. Glue the pin back in place, centered directly above the stem.

Whether you’re Irish or not, do you put on the green for St. Patrick’s Day? Let’s hear from you. Post a comment to be entered in this week's drawing for a book from our Book Club Friday guest author. -- AP

Monday, February 7, 2011

CRAFTS WITH ANASTASIA-- SHABBY CHIC PHOTO FRAME


Valentine’s Day is only a week away. Here’s a quick craft to dress up a special photo for your sweetie. If your sweetie is more the beer and pretzels sort, make this for yourself or your mom or your favorite aunt.  -- AP

Materials
unfinished wooden photo frame (available at craft stores); white primer spray paint; assorted lace trims, ribbon, buttons, beads, and other accessories; fabric glue and jewelry glue

1. Spray frame with light coat of primer. Leaving some of the wood grain showing through the paint will add to the antique look.

2. Position the lace trims and ribbons on the frame to form an appealing collage effect. Glue in place with the fabric glue.

3. Place the buttons, beads, and other 
accessories around and on top of the lace and ribbons. Glue in place with the jewelry glue.

4. Insert that special photo and wrap your gift.

Do you celebrate Valentine’s Day? Partake in any annual Valentine’s Day traditions? Or do you ignore the holiday for whatever reason? Let’s hear from you. -- AP

Monday, August 2, 2010

CRAFTS WITH ANASTASIA--GUEST AUTHOR AND CRAFTER CHRISTINE VERSTRAETE


Today, I welcome Christine Verstraete, author and crafter. Along with writing mysteries and short stories, Christine is the author of the children’s book Searching for a Starry Night, A Miniature Art Mystery for ages 9 and up, and is here today to talk about her book and share a miniature craft with us.

Christine is in the middle of a blog tour and is offering some prizes to anyone who comments on her guest posts during the tour. One person will win a Kindle copy of
Searching for a Starry Night. (If you don’t own a Kindle, you can get a free Kindle for PC download.) One person will also win a miniaturized dollhouse collector’s edition of the first chapter from the print edition of Searching for a Starry Night, by miniaturist LeeAnn Borgia. Also, to celebrate the release of the revised Searching for a Starry Night, Christine is offering a copy of the print edition when it becomes available.

Since Christine is choosing the winners herself from various blogs where she’s guest posting, in order to be eligible for one of the prizes, you’ll have to include your email address when you comment today.
-- AP

Anastasia, thanks for welcoming me to your great blog!  Before I get to the craft project, I’d like to tell everyone a little bit about Searching for a Starry Night. In the book Sam, her BFF Lita, and a mischievous dachshund named Petey face a cranky housekeeper, a dog-hating gardener, and an ancient family curse as they search for a missing miniature replica of Van Gogh's famous painting, "Starry Night."

Besides being a writer, I enjoy creating and crafting dollhouse miniatures, so I thought I'd share a simple idea that can be used for dollhouses or for decorating a scrapbook or other project.

Materials:
Cotton fabric with designs to cut out, small scissors, tacky glue, cotton batting, red and silver fine glitter (or desired colors), wood dollhouse furniture (optional), scrapbook paper, box or other project

Directions:

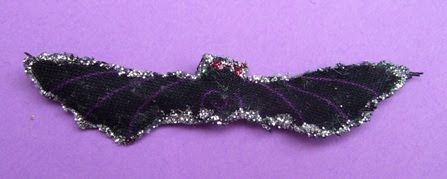
1. Choose a fabric with designs in the size you want to cut out. Since I wanted to use this for a smaller scale Halloween dollhouse, I chose a smaller print fabric.

2. Cut out the design, leaving a slight edge all around that will be glued. Cut a second piece from same design or coordinating fabric for the back.

3. Starting with the front piece, dot top edge of wrong side with tacky glue. Position over wrong side of bottom layer. Hold in place with fingers until glue sets.

4. Tuck a small piece of cotton batting between two layers of fabric.

5. Add dots of tacky glue around wrong side of remaining edges. Hold in place, making sure edges match, until glue sets.

6. After glue is set, dot tacky glue around perimeter edges of front. Sprinkle with fine glitter. Allow to dry.

7. If you're not using this project for a dollhouse pillow, the finished piece can be used as a 3D decoration for a scrapbook page, photo album, a letter, decorative jewelry box, etc. Use your imagination!

(Design, photos and project © 2010 C. Verstraete. Cannot be duplicated or reprinted without written permission.)

Thanks for joining us today, Christine!
Remember, if you want to be eligible for the prizes Christine is offering, don’t forget to include your email address in your comment today. 
-- AP

Monday, July 12, 2010

CRAFTS WITH ANASTASIA--GUEST DESIGNER SPARKLE

Guest designer Sparkle from The Sparkle Studio is filling in for me today with (what else?) a sparkly craft! You can find lots more craft project's at Sparkle's blog. -- AP

Sparkle’s Peace Hanger
Designed by Sparkle


I have a stash of craft supplies that I have collected and never used.   So sometimes, it is a good exercise for me to use only things from my stash without going to the store for more components.  For me, this is a “stash only” project. Maybe you have some similar things in your stash.

You need:
·    a surface: I used a scrap piece of wood that I sanded smooth, you could also use a canvas or a piece of watercolor paper
·    a piece of fabric big enough to cover the front of the surface (you could also use paper)
·    Mod Podge/ flat brush
·    Big & Glitzy Glitter Glue
·    Ribbon to match either the fabric or the Big & Glitzy: about 1 1/2 yd.
·    #2 pencil
·    computer and printer
·    drill and drill bit

Try this:
1.     Drill holes in the top corners of the surface.
2.     Mod Podge the fabric to cover the  front of the surface.  Trim as needed.  Set aside to dry.

3.  On the computer, type Peace.  Make it in a font you like and size it to fit your surface.  Print it.

4.  Turn the paper over.  Scribble the lines of the word with the #2 pencil.

5.  Place the pattern pencil side down on the fabric covered surface.  Trace the word, transferring pattern lines to fabric.

6.  Cover pattern lines with Big & Glitzy.  Let dry.


7.  Use ½ yd or ribbon for hanger.  String ends through holes in surface.  Tie knots in back.  Use remaining ribbon to make a bow. Tie it to the ribbon on one side just above the plaque.
This is a quick and easy project to give as a gift or hang on your own wall.  Select colors that you like or have in your stash.
Glitter on!
Sparkle

Thanks so much for stopping by, Sparkle! I'm sure you've inspired many readers to tackle their crafts stash. So let's hear from our readers. What have you made from your stash? Everyone who posts a comment this week is entered in the drawing to win a book from our Book Club Friday guest author. -- AP