Featuring guest authors; crafting tips and projects; recipes from food editor and sleuthing sidekick Cloris McWerther; and decorating, travel, fashion, health, beauty, and finance tips from the rest of the American Woman editors.

Note: This site uses Amazon affiliate links. As an Amazon Associate, I earn from qualifying purchases.
Showing posts with label Easter crafts. Show all posts

Sunday, March 13, 2016

#CRAFTS WITH ANASTASIA--CROSS STITCHED EASTER OR NURSERY BUNNY

This cross stitch bunny design will work equally well for Easter or in a baby nursery. Stitching area is 55w x 43h and measures 4" x 3" when stitched on 14-ct. fabric. 

Cross stitch with two strands floss. Backstitch with one strand black.

Sunday, April 6, 2014

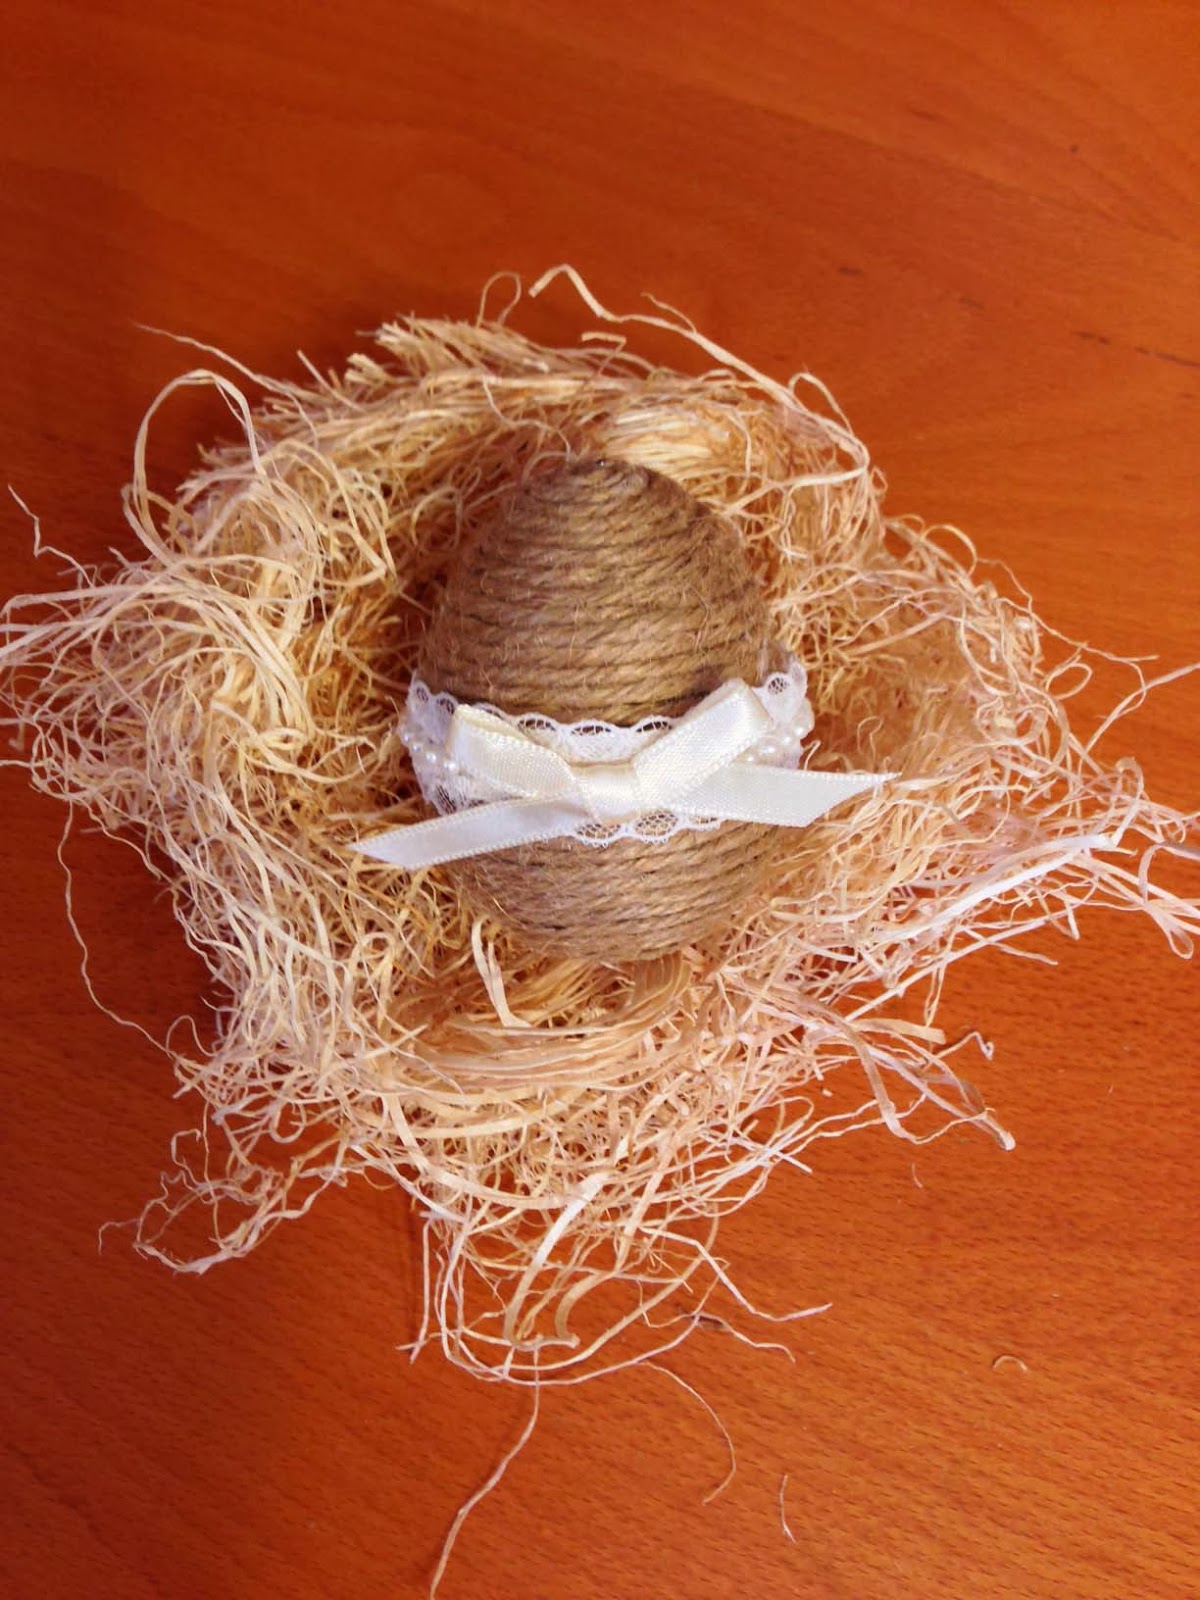
CRAFTS WITH ANASTASIA--SHABBY CHIC EASTER EGG

For those of you who love the shabby chic look, here’s a simple way to make Easter eggs that doesn’t involve piercing shells and blowing out the insides. Make a grouping and display them on a bed of excelsior or in a bowl for a centerpiece.

Shabby Chic Easter Egg

Materials (for each egg):
3” Styrofoam egg
ball of jute
tacky glue
straight pins
scraps of ivory ribbon and lace trim

Place a small amount of tacky glue on the top of the egg. Place the end of the jute at top point of the egg and secure with one of the straight pins. Begin winding the jute around the egg, adding glue as you work to cover the entire egg. Secure end of jute with another straight pin.


Glue lace trim around center of egg, securing with pins. Make a bow from ribbon and glue over lace.

Sunday, March 30, 2014

CRAFTS WITH ANASTASIA--EASTER CARDS

Have you noticed the price of greeting cards lately? It’s next to impossible to buy a nice one for under four or five dollars. I don’t know about you, but I’d rather put that money toward a gift. But people do expect cards on holidays and are disappointed when they don’t receive them. So this year, why not make your Easter cards? I made the one above in less than ten minutes using materials I had in my crafts closet and downloads of computer images.

The first thing you’ll need is card stock. You can buy a package of pre-folded blank greeting cards with envelopes at any office supply store, or just use scraps of index stock you have left over from other paper craft projects. Cut the stock the length of whatever envelope you have on hand x twice the height. Score down the middle and fold in half.

Cut one or two sheets of scrapbook paper to layer on top of the front of the card. I cut the pink polkadot sheet 1/2” smaller than the card and the blue sheet 1/2” smaller than the pink sheet. Using paper glue, glue the layers on the card.

You can find Easter image clip art on the Internet. I Googled “antique Easter card images” and found many to choose from. Print your image to fit the card. I decided to glue mine on at an angle for a little bit more interest.


Finish your card by adding ribbons, lace, gems, or buttons as embellishments.

Sunday, March 17, 2013

CRAFTS WITH ANASTASIA - EASTER EGG BUNNY


Here’s a cute little Easter bunny to add to a child’s Easter basket. Or make several and add one at each place setting for Easter dinner.

Easter Egg Bunny

Materials:
2-1/2” Styrofoam® egg, scraps of pastel print calico fabrics, pinking shears, ruler, pencil or fabric marker, tacky glue and jewelry glue, foam brush, 2-1/2” white or straw doll hat, two 5mm wiggle eyes, two 5mm white pompoms, 3mm pink pompom, scraps of white and pink felt, scrap of cardboard

1. Using the ruler and pencil or fabric marker, draw 3/4” squares on fabric scraps. Cut out squares with pinking shears. You’ll need approximately 30 squares to cover the egg.

2. Water down the tacky glue to a consistency that will be easy to spread with the foam brush. Working one fabric square at a time, glue squares to egg, overlapping edges. Cover egg completely with fabric squares. Allow to dry.

3. Print out patterns to 1-1/2" in height. Using pattern, cut out feet from cardboard. Glue a piece of white felt to cardboard. Allow to dry. Trim felt to cardboard.

4. Using pattern, cut out two white felt ears and two pink felt ears. Glue a pink ear to a white ear. Allow to dry. Apply small amount of glue to bottom of pink ear. Fold ears in half at bottom edge. Allow to dry.

5. Glue hat to top of egg. Glue an ear to each side of hat.

6. Glue on eyes (using jewelry glue) and pompoms as shown in photo. Make a small bow from ribbon and glue to egg as shown.

7. Glue bottom of egg to feet.

Monday, March 11, 2013

CRAFTS WITH ANASTASIA - DECOUPAGED EASTER PHOTO ALBUM


Many people take family photos at Easter. Why not create an Easter album for all of those photos you’ve collected over the years? I used images from a Victorian themed calendar I’d saved. You might want to use greeting cards you’ve collected over the years. You can also download images, but if you do, be sure to use a laser printer. The ink from inkjet printers will smear when you apply the decoupage medium.

Decoupaged Easter Photo Album

Materials: photo album (any size), Easter artwork from greeting cards or calendars, craft stick (optional,) foam brush, scissors, découpage medium, tweezers (optional.)

Directions:
1. Cut out desired images from artwork. Arrange on photo album cover.

2. Working one cut-out at a time and using the foam brush, apply decoupage medium to the wrong side of the artwork.

3. Position artwork on the album, using the tweezers to aid in placement if desired.

4. Eliminate wrinkles, air bubbles, and excess medium by gently pushing down on the cut-out with your fingers or the craft stick, working from the center outward. Remove any excess medium with a damp cloth.

5. Apply the next cut-out in the same manner. Repeat until all images are adhered to the album.

6. Allow decoupage to dry completely. Once dry, apply several coats of découpage medium to the entire surface, allowing each coat to dry completely before applying the next coat.

Sunday, April 17, 2011

CRAFTS WITH ANASTASIA-- LACE TRIMMED EASTER EGG

Our final Easter egg craft uses scraps of lace, ribbon, and pearl trims. 


LACE TRIMMED EASTER EGG

Materials:
1-7/8” x 2-1/2” Styrofoam egg
24” lengths of ribbon, lace, and pearl trims
sequin pins

Today’s decorative Easter egg requires no gluing. The lace trims are attached with sequin pins. Begin by pinning the widest trim to the bottom of the egg. Wrap the trim over the top of the egg and back to the bottom, securing with pins. Trim. Using the same trim, repeat, bisecting the first layer at the top center of the egg. The next widest trim is attached in the same manner to cover more of the egg. Keep adding trim until the entire egg is covered.


Readers, don't forget to post a comment to be entered into this week's drawing for a book from our Book Club Friday guest author. -- AP

Sunday, April 10, 2011

CRAFTS WITH ANASTASIA-- PEARL COTTON EASTER EGG

Today’s Easter egg craft helps you use up all those scraps of pearl cotton leftover from needlework projects. Don’t have any pearl cotton? Use embroidery floss or yarn.

PEARL COTTON EASTER EGG

Materials:
1-7/8” x 2-1/2” Styrofoam egg
#3 pearl cotton in various colors
tacky glue

This is about as easy a craft as you can get. Simply apply glue to the egg. Then wrap lengths of pearl cotton around the egg. Begin at the center of the egg and work outwards toward the top and bottom of the egg. For ease in working, poke a piece of heavy gauge wire or thin dowel to the bottom of the egg and hold the wire or dowel as you glue on the pearl cotton.


Post a comment, and you could win the book being given away this week by our Book Club Friday guest author. -- AP

Sunday, April 3, 2011

CRAFTS WITH ANASTASIA-- POMPOM EASTER EGG

If you craft, you most likely have pompoms leftover from other crafting projects. Today we have another Easter egg project, one that will help you use up some of those leftover pompoms.

POMPOM EASTER EGG

Materials:
1-7/8” x 2-1/2” Styrofoam egg
5mm - 15mm pastel and white pompoms
tacky glue

This is about as easy a craft as you can get. Simply apply glue to the egg. Then glue the pompoms randomly around the egg. Begin at the center of the egg and work outwards toward the top and bottom of the egg. For ease in working, poke a piece of heavy gauge wire or thin dowel to the bottom of the egg and hold the wire or dowel as you glue on the pompoms.