Featuring guest authors; crafting tips and projects; recipes from food editor and sleuthing sidekick Cloris McWerther; and decorating, travel, fashion, health, beauty, and finance tips from the rest of the American Woman editors.

Note: This site uses Amazon affiliate links. As an Amazon Associate, I earn from qualifying purchases.
Showing posts with label fabric crafts. Show all posts

Sunday, March 8, 2020

CRAFTS WITH ANASTASIA--DARNING EGGS AND BETSY WETSY DOLLS

Darning Mushroom with Yarn and Needle
Author Lois Winston, she who writes about me, stops by today to talk about the first time she sewed something.

Do you remember the first time you picked up a needle and thread? Probably not, unless the memory is more involved, which is the case for me.

When I was four years old, I was spending the day at my grandparents’ house. My grandmother was sitting in the kitchen, darning a sock. Most people these days have no idea what darning means, let alone how to do darn, unless they lived through the Great Depression. Even people lucky enough to have income during those years, as my grandparents did, never wasted anything. If you tore a dress, a shirt, or a pair of pants, you patched it. If your big toe wore a hole in a sock, you darned it.

Darning involves placing a wooden egg or mushroom shape inside a sock. Some darning eggs have handles attached to them, as in the photo above; others don’t.

The darning egg is placed in the sock. The hole is stretched over the egg and held tightly in place with one hand. Then, with needle and thread to match the color and weight of the sock, a series of parallel vertical running stitches are made close together over the hole, extending at least 1/2" beyond the hole on all sides. Once the hole is covered with these vertical stitches, horizontal rows are woven over and under through each of the vertical stitches until this woven patch completely mends the hole.

So getting back to my story…

Grandma was darning a sock, and I wanted to sew something. “You have nothing to sew,” she said.

“Betsy Wetsy’s dress is too long,” I said, holding up the doll for her to see. “She’ll trip.” 

Betsy Wetsy was a popular “drink-and-wet” doll in the 1950’s. The doll came with a baby bottle you filled with water. You inserted the bottle’s nipple into the hole in the doll’s mouth and squeezed the bottle to “feed” Betsy. Then she’d wet her diaper from the hole in her body. 

I have no idea why my doll’s dress extended below her feet. The dress must have been a hand-me-down from another doll. Come to think of it, Betsy was also probably a hand-me-down from an older cousin.

“Needles are sharp,” said Grandma. “You’ll stick your finger.”

“No, I won’t. I promise.”

After a good deal of pestering on my part, Grandma finally gave in. She threaded a needle for me, and told me to be careful. I marched into the living room, pulled the ottoman up to the sofa as a seat, and used the sofa cushion as a table. With Betsy still wearing her dress, I began to sew a hem.

I was extremely pleased with my efforts—until I lifted Betsy to show Grandma what a good job I’d done, only to discover I’d hemmed the dress to the sofa cushion! Needless to say, Grandma was not happy.

“But I didn’t stick my finger,” I said.

Click here to watch a Betsy Wetsy TV commercial from the 1950’s.

As I grew older, I began sewing my own clothes and eventually designed dolls, just like Emma  Wadsworth, my heroine in Love, Lies and Double Shot of Deception


Love, Lies and a Double Shot of Deception


Life has delivered one sucker punch after another to Emma Wadsworth. As a matter of fact, you could say the poor little rich girl is the ultimate poster child for Money Can’t Buy Happiness — even if she is no longer a child.

Billionaire real estate stud Logan Crawford is as famous for his less-than-platinum reputation as he is his business empire. In thirty-eight years he’s never fallen in love, and that’s just fine with him — until he meets Emma.

But Emma’s not buying into Logan’s seductive ways. Well, maybe just a little, but she’s definitely going into the affair with her eyes wide open. She’s no fool. At least not any more. Her deceased husband saw to that. Besides, she knows Logan will catch the first jet out of Philadelphia once he learns her secrets.

Except things don’t go exactly as Emma has predicted, and when Philadelphia’s most beloved citizen become the city’s most notorious criminal, she needs to do a lot more than clear her name if she wants to save her budding romance with the billionaire hunk someone is willing to kill for.

Buy Links

Sunday, August 4, 2019

SUMMERTIME SIZZLING #MYSTERY #SALE

Summertime, and the living is anything but easy for me. It’s a hundred and ten in the shade, and my already over-complicated life just got even more complicated, thanks to my author Lois Winston, who’s plunged me into yet another murder investigation.

You’d think she’d give me a bit of a reprieve since my extremely difficult communist mother-in-law Lucille Pollack is in a rehab center recovering from a minor stroke. But no, at least half the center’s staff overhears Lucille threaten to strangle her roommate. Less than twenty-four hours later the woman is found dead in her bed—and not from natural causes.

Of course Lucille becomes the prime suspect in the roommate’s murder. I know Lucille is all bluster and no action, but the cops aren’t willing to take my word for it. And no matter how much easier my life would be without her living under my roof, my conscience won’t allow me to look the other way while they lock her up for a crime she didn’t commit.

You can read all about the mayhem Lois gets me into in Revenge of the Crafty Corpse, which is on sale throughout the month of August on Amazon for only .99 cents. Read it in the comfort of your air-conditioned house or while sipping an ice tea while relaxing on vacation. That way at least one of us will enjoy the summer.

Revenge of the Crafty Corpse
Anastasia Pollack’s dead louse of a spouse has left her with more bills than you can shake a crochet hook at. Teaching craft classes at her mother-in-law’s assisted living center seems like an easy way to supplement her meager income. But when Lyndella Wegner—a 98-year-old know-it-all with a penchant for ruffles and lace—turns up dead, Anastasia’s cantankerous mother-in-law becomes the prime suspect in her murder. Upon discovering that Lyndella’s scandalous craft projects—and her scandalous behavior—made her plenty of enemies, Anastasia sets out to find the real killer before her mother-in-law ends up behind bars.

Sunday, October 7, 2018

#CRAFTS WITH ANASTASIA--FABRIC SCRAP CRAFT IDEAS

Waste not, want not. That’s what my great-aunt Penelope Periwinkle used to say, and now that I’m counting every penny, I realize how right she was. But even before pauperdom walloped me upside the head, I always saved all the fabric scraps from my sewing projects. If you’ve ever had to buy 1/8-yd. of fabric because you needed one 3” x 12” strip, you know how right I am. I keep all my scraps of fabric in a plastic storage bin, and it’s amazing how often I find myself rooting through that bin to find exactly what I need. However, sometimes the storage bin gets to overflowing. When that happens, I have lots of project ideas stored away for using up some of that overflow. Here are a few I’ll share with you today.

*Make sachet bags to drape over your clothes hangers or place in dresser drawers.

*Create drawstring gift bags for odd-shaped or any-size presents. You’ll be giving the recipient two gifts in one because afterwards, the gift bag can be used to hold jewelry, lingerie, toiletries, or just about anything else. Decorate the bags with smaller scraps of fabric and scraps of ribbon and lace.

*Make a crazy quilt fabric-covered picture frame. Embellish the frame with ribbon, lace, buttons, and beads.

*Cut out small simple shapes, such as hearts. Sew two together and stuff for ornaments or gift package decorations. Glue them to pin backs or barrettes for soft-sculpture jewelry.

*Glue or fuse fabric to heavy paper and use as appliqués for hand-made greeting cards and gift tags.

*Cut fabrics of different textures, patterns, and colors into 3”, 4”, or 5” squares. Sew six squares of the same size together to form a cube, then stuff. These make wonderful, tactile soft blocks for babies and toddlers.

*Make yo-yo’s in various sizes to embellish clothing or craft projects.

Several of the Anastasia Pollack Crafting Mysteries feature fabric scrap craft projects or projects that include fabric scraps.

Sunday, June 26, 2016

#CRAFTS WITH ANASTASIA--PATRIOTIC TOPIARY

Next week we celebrate Independence Day. This Patriotic Topiary first appeared on the blog in May of 2010 as the inaugural post. Since then we've had many followers join us, and being that this is one of my favorite craft projects from the blog (because it was the first), I thought it was time for a repeat performance. 

One of the great thing about this design is that it requires no sewing. I love using it as a centerpiece during 4th of July, Memorial Day, and Labor Day BBQ's, but if you don't care for the red, white, and blue color scheme, you can swap out the colors to match any room in your house. 

Patriotic Topiary
Materials: 
metal, wood, or ceramic container or clay pot, approx. 6” x 6” x 6”
15” long 5/8” wooden dowel
6” white Styrofoam® ball
1 yd. 1” wide blue print ribbon
3” x 45” piece blue gingham
scraps of red, white, and blue fabric
floral foam, enough to fit inside container
straight pins
green excelsior
hot glue gun and glue sticks
tacky glue

Note: Use hot glue for all gluing except where tacky glue is indicated.  Model shown made with red glitter metal container purchased from crafts store.

1.  Insert dowel halfway into Styrofoam® ball.  Remove dowel.  Dispense glue into hole in ball.  Reinsert dowel.

2. Glue floral foam inside container.  Insert dowel into center of floral foam.  Remove dowel.  Dispense glue into hole in floral foam.  Reinsert dowel.

3.  Apply a thin coat of tacky glue to dowel.  Wrap ribbon around dowel to cover.

4.  Tear fabric into 1-1/2” x 6” strips.  Place two strips wrong sides together and tie a knot at center.

5.  Insert a straight pin into knot.  Dip pin in tacky glue and quickly insert into Styrofoam® ball.  Repeat until ball is completely covered.

6.  Glue excelsor over floral foam inside container.

7.  Tie blue gingham strip around container.

Sunday, April 17, 2016

#CRAFTS WITH ANASTASIA--GUEST AUTHOR AND QUILTER MARISSA DOYLE

Marissa Doyle got distracted on her way to becoming an archeologist. But she’s put her passion for history into writing historical fantasy for teens and adult...just don’t ask her where the fantasy elements come from. Learn more about her books at her website/blog and at her teen history blog.

I'm a writer. I'm also a crafter who loves anything to do with fabric: I sew (both clothes and home decor), upholster, do fabric decoupage, and most of all, quilt. My "office" (okay, the guest bedroom, but thank heavens all my family lives only about an hour away or I'd be in deep doo-doo) is divided more or less in half: one part has my desk, computer, filing cabinets, and bookcases full of reference materials. The other half has my sewing machine, cutting table, ironing board, design wall, and the large bins containing my fabric stash.

It works out pretty well: if I get stuck while writing and need to think about a plot point or a character's reaction to an event, I can just get up from my desk, go over to my sewing machine, and chain-piece some half-square triangles for my current quilting project to give my brain a chance to work on the problem without really thinking about it. When I have it figured out, I go back to my desk. Win-win situation!

I like to joke that of my two passions, writing wins because it doesn't leave threads all over the carpet. And yes, it's pretty funny that one side of my office has a nice clean rug and the other side is generally less so. But then one day, the two halves blurred together. I got an idea for a novel in which quilting played a major role.

And because a little fantasy or magic creeps into everything I write, I wasn't just going to write about plain old quilts--no, mine were going to contain magic, unwittingly pieced into them by my heroine who has no idea she is doing so...until one of her quilts traps the evil entity terrorizing her small Cape Cod town and saves the selkie she’s lost her heart to. Several types of quilts make an appearance in Skin Deep, but I knew the most important quilt in the book would have to be my favorite design, Storm at Sea.
Storm at Sea basic quilt pattern
A Storm at Sea Block is made up of squares and rectangles set in such a way as to give an illusion of curves without actually including any curved seams, which can be tricky to get right. The resulting quilt has a strong sense of motion, almost like the surface of a restless sea. From what I’ve been able to find, it’s not all that old a block design—probably early 1900s—but it has inspired some breathtakingly beautiful quilts. It’s also a very versatile block: playing with the color arrangement in the blocks can lead to very different looking quilts.

Plug “Storm at Sea Quilt” into Google Images or Pinterest and see what turns up: it’s pure eye candy. Feeling inspired? I’ve got three Storm at Sea patterns for downloading on my website; get out your markers and colored pencils and see what you can do...or what quilt magic you can create. As for me...like my heroine in Skin Deep, Garland, I have more than one stash box of blue fabrics because I can’t resist blue...and one of these days, I’ll be bouncing over to do some piecing on a Storm at Sea quilt while I work on my next book.

Skin Deep
After a painful divorce, Garland Durrell looks forward to settling into her home on Cape Cod to make the quilts that are her passion. On the first morning of her new life she finds a man and a small boy washed up on the beach, both badly wounded. Since the town chief of police is strangely reluctant to help, Garland takes on the care of the mysterious pair who don't seem to remember what happened to them--and feels her own heart begin to heal.

Alasdair does remember. He and his son Conn are the last of the ruling family of selkies from the waters around the Cape, locked in a decades-long struggle with an evil that threatens all, selkie and human. He’s not sure if he can trust the lovely, blue-eyed woman who takes them in until he touches one of her quilts and feels the magic she’s sewn into it...and the emotions that he never thought he’d feel again.

But the evil entity that stole Alasdair’s sealskin and left him for dead quickly senses both his presence and Garland’s magic, and is determined to destroy one and possess the other. Only Garland and her quilts, made with a power she barely believes she has, can save them all from destruction—if she can avoid being destroyed first.

Sunday, August 2, 2015

#CRAFTS WITH ANASTASIA--NO-SEW LACY BUTTON TOTE

Killer Crafts & Crafty Killers is in its sixth year. Because our readership has grown tremendously since those early days, I’ll occasionally feature a craft that appeared several years ago. Today I’m bringing back the no-sew lacy button tote. It’s one of my favorites and super simpler to make. I chose a 9” x 12” canvas tote, but depending on the end use, you might want to go with a smaller or larger tote. The totes are available in a variety of sizes from local craft stores.

Materials:
9” x 11” natural canvas tote
3/4-yd. 2” wide gathered natural Cluny lace
3/4-yd. 7/8” wide flat natural Cluny lace
7 assorted 2” natural lace medallions
assorted white, clear, and natural buttons in varying sizes
fabric glue
gem glue
air-soluble fabric marker
ruler

1. Using the fabric marker, draw two perpendicular lines 2” from center of tote.

2. Cut the flat Cluny lace into two equal pieces. Using the fabric glue, glue the flat edge of each piece to the outside of each line, lining up the top edge with the top of the tote and wrapping the bottom edge around to the bottom of the tote.

3. Using the fabric glue, glue the gathered Cluny lace to the top edge of the tote, overlapping cut ends at center back.

4. Using the fabric glue, glue the lace medallions randomly onto the tote, two on either side and three in the middle section.

5. Using the gem glue, glue the buttons randomly around the lace medallions. 

Sunday, March 22, 2015

#CRAFTS WITH ANASTASIA--WINTER TOPIARY

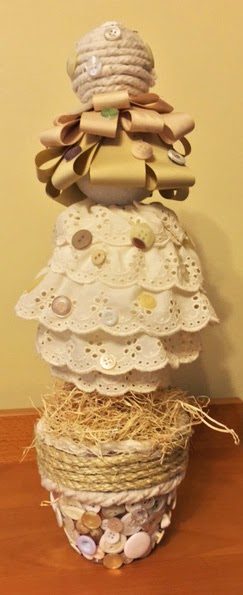
In January I featured a Jute and Button Clay Pot Flameless Candle Holder on the blog.  Today I’m repurposing that decorated clay pot to create a winter topiary.

Materials
Jute and button decorated clay pot from January 26thblog post; one each 4”, 3”, and 2” Styrofoam balls; two toothpicks; 9” length 1/4” diameter dowel; floral foam; tacky glue; 1/8” diameter jute cord; 2 yds. 2” wide gathered ecru eyelet; 1 yd. 1-1/2” wide ecru grosgrain ribbon; cotton cording; sequin pins; assorted white and ecru buttons; excelsior; low-temp glue gun

1. Decorate the clay pot following the directions from the January 26th blog post.

2. Glue floral foam into clay pot.

3. Glue a toothpick halfway into top of 4” Styrofoam ball. Glue the 3” ball onto the 4” ball. Glue the second toothpick into the top of the 3” ball. Glue the 2” ball to the top of the 3” ball.

4. Wrap the middle 3” of dowel with jute cord, glueing in place. Allow to dry.

5. Poke a hole in the bottom of the 4” ball. Glue one end of the dowel into the hole and the other end into the center of the floral foam. Allow to dry.

6. Glue gathered eyelet spiraling around 3” ball, beginning at bottom and working up to top of ball. Use sequin pins dipped in glue to hold in place.

7. Cut the 1-1/2” wide grosgrain ribbon into 3” lengths. Fold each in half. Pin ribbon, overlapping sides slightly, around the center of the 2” ball.

8. Cut the 1” wide grosgrain ribbon into 3” lengths. Fold pieces in half and continue attaching in same manner as above in two overlapping rows around first row of ribbon.

9. Glue cotton cording around 2” ball.

10. Glue excelsior into pot.

11. Using the glue gun, randomly glue assorted buttons to topiary.

Sunday, November 2, 2014

CRAFTS WITH ANASTASIA--GUEST AUTHOR DIANE VALLERE

Diane Vallere writes cozy mysteries with a stylish twist. She authors the Style & Error Series, currently optioned for TV, the Mad for Mod mysteries, and the fabric shop-themed Material Witness mystery series. She launched her own detective agency at ten years old and has maintained a passion for shoes, clues, and clothes ever since. Learn more about Diane and her books at her website.

Five things to do with one yard of fabric
(and a few items you probably have lying around the house)

Fabric has always held a bit of magic to me. I used to tag along with my mom on trips to the fabric store, where I’d wander the aisles and look at bolts of cotton, silk, taffeta, and wool, and wonder how exactly it was that someone knew what to do with it. My personal favorites were the colorful cottons, lined up in small clusters of coordinating colors: white with black polka dots, black with white polka dots, white with black lines, black with white lines, white and black check, etc. I could entertain myself for hours trying to pick my favorite combinations. My love of fabric stayed with me, even when a love of sewing faded into the background. Which is why I have a stash of fabric with no particular projects I mind. Someday, I think, I’ll have the perfect project for some/all of it. But in the meantime, I still find ways to enjoy it.

Here’s how:

1. Impromptu Table Cloth for a party spread: Find a small table that’s taking up space in your attic. Add a piece of wood on top and drape fabric over it. Match the fabric to the theme of the party. Voila! Instant ambiance and more space for hors d’oeuvres.


2. Art: Wrap the fabric over an inexpensive wooden frame and tuck in around the frame. (You can also glue it. School glue will wash out, leaving fabric undamaged. Glue gun glue will peel off when dry, also not damaging the fabric.) Voila! A pretty wall hanging. Perhaps an inexpensive way to freshen up a guest room or a hallway?


3. Curtain: Drape your fabric over a dowel rod and rest the ends in existing curtain rod hooks. OR buy a set of small rings with clips attached. Iron the raw edge of the fabric to the back and attach the clips along the length of the fabric. Feed clips over curtain rod. Voila! New curtains. (Neaten up by using an iron to fold raw edges under.)


4. Apron: Cut a length of ribbon long enough to tie around your waist. Double your yard of fabric over the ribbon and tie in the back. Voila! Instant apron. Coordinate fabric to your home interior or party theme for extra fun.


5. Vase: Fold fabric down so it is the width of an inexpensive vase. Lay vase on fabric and gently roll until the vase is covered. Secure in back with pins or tie with pretty ribbon (or both.) Voila! Instant room accent. 

What creative ways can you think of to use a yard of fabric?

Suede to Rest
With her career as a dress designer in shreds, Polyester Monroe is looking forward to a fresh start. But as it all unfolds, the pattern to a new beginning looks a lot like murder.

When Poly Monroe was little, she loved playing in her family's textile store. But after a fatal family tragedy, Land of A Thousand Fabrics was boarded up and Poly never expected to see the inside again. Now, as inheritor of the long-shuttered shop, she's ready to restore the family business. However her two new kittens, Pins and Needles, aren't the ones causing a snag in her plans...

Not everyone wants Poly back in San Ladrón, especially a powerful local developer pressuring her to sell--and leave town fast. But even when the threats turn deadly, she's not ready to bolt. Because Poly is beginning to suspect that the murder behind the shop is tied to a mystery in her family's unsettled past that she's determined to solve...before her own life is left hanging by a thread.

Buy Links

Sunday, October 12, 2014

CRAFTS WITH ANASTASIA--AUTUMN YO-YO WREATH

Autumn Yo-yo Wreath

Those of you familiar with this blog know that I’m partial to yo-yo crafts. As a matter of fact, Revenge of the Crafty Corpse, the third Anastasia Pollack Crafting Mystery, features yo-yo crafts.

Now that there’s a chill in the air, it’s time to think about autumn crafting. So I came up with this quick and easy yo-yo wreath that you can hang on your front door until it’s time to switch over to your Christmas wreath.

Materials: 6” x 6” piece of cardboard, compass, three 6” x 6” pieces lightweight cotton or cotton blend fabric in autumn colors/prints, fabric marker, three decorative buttons, 9” vine wreath, 8 yds. rust-colored raffia ribbon, hot glue gun and glue stick, scissors, sewing needle, quilting thread, 9” jute

Using the compass, draw a 6” diameter circle on the cardboard. Cut out the circle. Using the cardboard circle as a template, draw a circle on the back of each of the pieces of fabric. Cut out the circles.

With the wrong side of the fabric facing up, fold the edge of one circle over 1/4". Using a running stitch, sew around the entire circle close to the fold line. Pull the thread tightly so the fabric cinches up to form the yo-yo. Flatten and shape the yo-yo. Run the needle through the center back to secure. Repeat for remaining circles.

Cut raffia into eight equal lengths. Secure ends by knotting. Glue one knotted end to back of wreath. Wrap raffia around wreath, securing opposite end at back of wreath with hot glue.

Glue a decorative button over the center hole of each yo-yo. Glue yo-yos to bottom of wreath.

Tie jute to top of wreath for hanging loop.

Sunday, September 28, 2014

CRAFTS WITH ANASTASIA--NO-SEW FABRIC PUMPKIN


It's hard to believe October is only two days away. However, if you frequent craft and home dec stores, you've probably been seeing Halloween items since July. Today I'm featuring a repeat of a craft that first appeared here blog three years ago because it's quick and easy and also a no-sew craft. This fabric pumpkin would look great on a shelf or just about anywhere else. And you don’t have to worry about it rotting! -- AP

No-Sew Fabric Pumpkin

Materials:
5” Styrofoam ball
scraps of orange, gold, and brown print fabrics
1 yd. DMC green Memory Thread
3” cinnamon stick
9” length 3/8” diameter dowel
X-acto knife
tacky glue

1. Using the X-acto knife, carve out the top and bottom of the Styrofoam ball, flattening it into more of a pumpkin shape.

2. Sharpen one end of the dowel into a point. You can use an electric pencil sharpener for this. Use the dowel to press creases into the Styrofoam to create the sections of a pumpkin.

3. Cut 2-1/2” x 8” pieces of fabric. Trim to form points at short ends.

4. Using the dowel, press the fabric into the creases to cover the sections. Alternate the various fabric colors.

5. Cut the Memory Thread into two 18” pieces. Wind the pieces around the dowel to curl.

6. Poke a hole in the top of the pumpkin. Fill the hole with tacky glue. Insert one end of each piece of Memory Thread and the cinnamon stick.

Sunday, June 1, 2014

CRAFTS WITH ANASTASIA--SHABBY CHIC JEANS POCKET NECK PURSE

There comes a time in the life of every favorite pair of jeans when you have to let go and send them off to jeans heaven. Before tossing those jeans, cut out the back pockets. It’s amazing how many craft projects you can make from jeans pockets. Here’s one that's great for those times when you don't want to carry a handbag. Your phone, ID, a credit card, a few dollars, some lip gloss, and a house key will all fit.

Shabby Chic Jeans Pocket Neck Purse

Materials:
Two jeans pockets cut from the back of a pair of jeans, assorted scraps of lace, a lace medallion (optional,) 1 yd. lace trim, assorted buttons, fabric glue, gem glue, spring-type clothespins

Note: Use fabric glue for all gluing except use gem glue for buttons.

1. Decide on placement of lace and optional lace medallion. Glue lace to one pocket, allowing lace to overhang edges.

2. Glue excess lace to back of pocket. Hold in place with clothespins until glue dries.

3. Glue cut edges of 1 yd. piece of trim to back top edge of pocket on both sides. Hold in place with clothespins until glue dries.

With wrong sides together, glue pockets to each other along side and bottom edges. Hold in place with clothespins until glue dries.


4. Decide on placement for buttons. Glue in place.

Sunday, October 20, 2013

CRAFTS WITH ANASTASIA--FLOWER POT PIN CUSHION


Materials: 3-1/2” clay flower pot, 3mm jute cording, tacky glue, 10” x 10” cotton print fabric, needle and thread, polyester fiberfill, jewelry glue, assorted buttons

1. Glue jute cording around flower pot from under lip to bottom.

2. Cut 9” lengths of jute. Wind each piece of jute into 1” diameter circles and glue around lip of pot.

3. Glue a button to in the center of each jute circle.

4. Cut a circle from the 10” fabric. The easiest way to do this is to use a plate as a template and trace around it.

5. Sew a gathering stitch around circle, 1/4” from cut edge. Pull threads to gather, stuffing as you go. Stitch opening closed.

6. Apply glue to inside rim of pot. With gathered side down, tuck stuffed fabric into pot.

Sunday, July 21, 2013

CRAFTS WITH ANASTASIA--ELEGANT YO-YO CHRISTMAS TREE TOTE


Elegant Yo-yo Christmas Tree Tote

Yo-yo crafts are the craft featured in Revenge of the Crafty Corpse, the third book in the Anastasia Pollack Crafting Mystery series. In keeping with our Christmas in July theme this month, here are directions for making an elegant Christmas tree tote that can also double as a gift bag.

Materials:
13” x 13” black canvas tote bag, 1/4-yd. green plaid lightweight cotton fabric, scrap of brown print lightweight cotton fabric, compass, lightweight cardboard or card stock, scissors, pencil, sewing needle, quilting thread, 7 antique looking gold buttons each 5/8”-3/4”, fabric glue

Directions:
1. Using the compass, draw a 4” circle and a 5” circle on the cardboard or card stock. Cut out the circles.

2. Using the cardboard circles as templates, trace a 4” circle on the brown fabric and six 5” circles on the green plaid fabric. Cut out circles.

3. For each yo-yo, hold the fabric circle with the wrong side facing you. Fold 1/4” of the raw edge toward the wrong side of the fabric. Using the quilting thread, begin the first stitch underneath the fold of the hem to hide the knot, then sew a running stitch around the circle. When you reach your starting point, and the circle is completely hemmed, pull the thread tight to gather the fabric. Smooth and flatten the yo-yo so the hole is in the center. This is the right side of your yo-yo.

4. Sew a button in the center of each yo-yo.

5. Arrange yo-yos to form Christmas tree on front of tote (see photo.) Glue yo-yos in place.